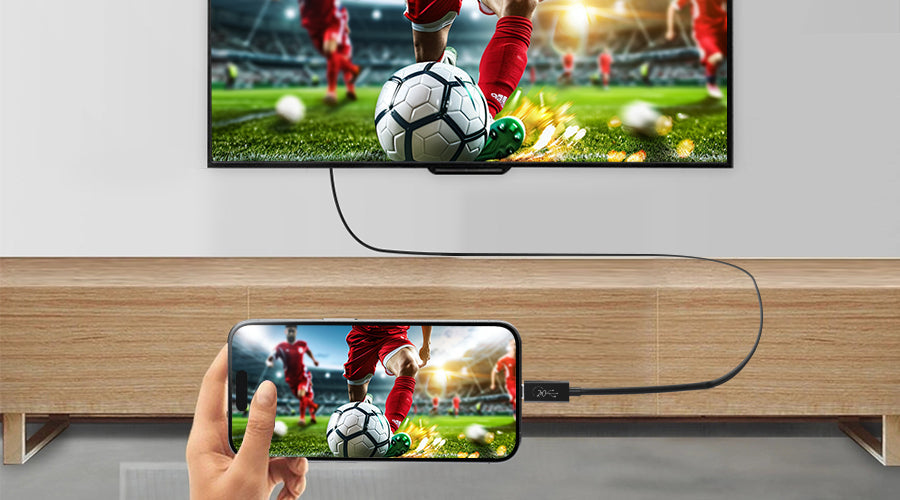
Haben Sie sich schon einmal gewünscht, dass Ihr Handy-Display etwas größer wäre? Vielleicht möchten Sie lustige Memes oder Urlaubsfotos mit Freunden und Familie auf dem großen Bildschirm teilen? Die Lösung liegt direkt in Ihrer Hand – im wahrsten Sinne des Wortes! Verbinden Sie Ihr Handy per USB mit Ihrem Fernseher und entdecken Sie eine völlig neue Welt voller Unterhaltung und Komfort.
Stellen Sie es sich vor wie Ihr eigenes Kino, nur dass Sie nicht nur zuschauen, sondern Regisseur, Produzent und Star zugleich sind. Mit nur wenigen Handgriffen spiegeln Sie das Display Ihres Smartphones auf Ihren Fernseher und verwandeln so jedes Wohnzimmer in einen privaten Vorführraum.
Aber warten Sie, es gibt noch mehr! USB-Anschlüsse sind nicht nur zum Vorzeigen da. Sie eröffnen auch Möglichkeiten für Gaming, Produktivität und sogar Präsentationen. Stellen Sie sich vor, Sie könnten Ihre Lieblings-Handyspiele auf einem riesigen Bildschirm spielen oder eine konferenzreife Präsentation direkt von Ihrem Telefon aus halten.
Tauchen wir also ein und erkunden die Welt von USB-Anschlüsse. Schnappen Sie sich Ihr Telefon und Ihren Fernseher und lassen Sie sich überraschen!
Inhaltsverzeichnis
- 1. Grundlegendes zu USB-Verbindungen
- 2. Vorbereitung vor dem Anschluss
- 3. Schritt-für-Schritt-Anleitung
- 4. Fehlerbehebung
- 5. Alternative Lösungen
- 6. Abschluss
- 7. Leute fragen auch
- 7.1 Warum lässt sich mein Telefon nicht über USB mit meinem Fernseher verbinden?
- 7.2 Wie verbinde ich mein USB-Gerät mit meinem Fernseher ohne USB-Anschluss?
- 7.3 Wie verbinde ich mein Android-Telefon über USB mit meinem normalen Fernseher?
- 7.4 Welches Format muss ein USB-Stick für den Fernseher haben?

Grundlegendes zu USB-Verbindungen
Grundlegende Anschlüsse:
Wenn es um den Anschluss Ihrer Geräte geht, ist USB wie das Schweizer Taschenmesser unter den Kabeln – vielseitig und praktisch. Im Gegensatz zu seinen Cousins HDMI und der kabellosen Bildschirmspiegelung bieten USB-Anschlüsse eine einzigartige Kombination aus Einfachheit und Leistung.
USB vs. HDMI vs.Drahtlose Bildschirmspiegelung
| Verbindungstyp | Vorteile | Nachteile |
| USB | - Einfach und weitgehend kompatibel - Stabil und zuverlässig Unterstützt Audio und Video | - Begrenzte Reichweite Benötigt Kabel |
| HDMI | - Hochwertige Audio- und Videoqualität - Lange Kabelreichweite | - Nur auf Audio/Video beschränkt - Kompatibilitätsprobleme |
| Drahtlose Bildschirmspiegelung | - Keine Kabel erforderlich - Flexible Positionierung | - Mögliche Verzögerung oder Störungen - Eingeschränkte Reichweite und Qualität |
Im Kern geht es bei der USB-Technologie (Universal Serial Bus) um die Datenübertragung zwischen Geräten. Sie ist wie eine digitale Datenautobahn, die es Ihrem Telefon und Fernseher ermöglicht, Dateien, Videos und sogar Displayausgaben nahtlos auszutauschen.
USB-Typen und -Adapter:
Nicht alle USB-Anschlüsse sind gleich. Im Laufe der Jahre haben sich verschiedene USB-Standards herausgebildet, jeder mit seinen eigenen einzigartigen Fähigkeiten und Besonderheiten. Vom einfachen Micro-USB bis zum eleganten und modernen USB-C – es ist wichtig zu wissen, welchen Typ Ihre Geräte unterstützen.
| USB-Typ | Beschreibung | Häufige Verwendung |
| Micro-USB | Kompakt und weit verbreitet in älteren Geräten | Laden, Datenübertragung |
| USB-C | Neuer, reversibler Stecker | Laden, Datenübertragung, Videoausgabe |
| USB 3.0 | Hochgeschwindigkeitsdatenübertragung | Externer Speicher, Kameras |
| USB 2.0 | Ältere, langsamere Datenübertragung | Tastaturen, Mäuse, Drucker |
Keine Sorge, wenn Ihre Geräte nicht über die passenden USB-Anschlüsse verfügen – Adapter und Konverter schaffen Abhilfe! Diese praktischen kleinen Gadgets fungieren als Übersetzer und ermöglichen die reibungslose Kommunikation zwischen Geräten mit unterschiedlichen USB-Typen.
Vorbereitung vor dem Anschluss
Gerätekompatibilitätsprüfung:
Bevor Sie sich kopfüber in die Welt der USB-Verbindungen stürzen, sollten Sie unbedingt sicherstellen, dass Ihre Geräte miteinander kompatibel sind. Schließlich möchten Sie doch nicht stundenlang versuchen, ein Festnetztelefon mit einer Mikrowelle zu verbinden, oder? (Obwohl, wer weiß, vielleicht ist das ja die nächste große Innovation!)
Um die Kompatibilität zu überprüfen, lesen Sie die Gerätehandbücher oder suchen Sie online nach „USB-Bildschirmspiegelung“ oder „USB-Videoausgang“ und geben Sie anschließend Ihr spezifisches Gerätemodell an. Die meisten modernen Smartphones und Fernseher unterstützen USB-Anschlüsse, aber Vorsicht ist besser als Nachsicht.
Liste der erforderlichen Geräte:
Nachdem Sie die Kompatibilität bestätigt haben, ist es an der Zeit, Ihre Ausrüstung zusammenzustellen. Hier ist eine kurze Checkliste mit den benötigten Dingen:
- Ihr Smartphone oder Tablet (der Star der Show!)
- Ihr Fernseher (die Großbildsensation!)
- Ein USB-Kabelkompatibel mit Ihren Geräten (die digitale Nabelschnur!)
- Eventuell notwendige Adapter oder Konverter (die Sprachübersetzer!)
Abhängig von Ihrer Konfiguration benötigen Sie möglicherweise auch:
- Eine externe Stromquelle für Ihr Telefon (um eine Entladung des Akkus bei längerem Gebrauch zu verhindern)
- Eine kabellose Tastatur und Maus (für einfache Navigation und Steuerung)
- A USB-Hub(wenn Ihr Fernseher nur über begrenzte USB-Anschlüsse verfügt)
Wenn Sie Ihre gesamte Ausrüstung zusammengebaut haben, sind Sie der Entfesselung der Leistungsfähigkeit von USB-Verbindungen einen Schritt näher!
Schritt-für-Schritt-Anleitung
Verbindungsvorgang:
Okay, es ist Showtime! Wir gehen Schritt für Schritt durch, wie du dein Telefon über USB mit deinem Fernseher verbindest:
- Suchen Sie die USB-Anschlüsse: Identifizieren Sie die USB-Anschlüsse an Ihrem Telefon und Fernseher. Sie sind normalerweise mit dem ikonischen USB-Symbol oder dem Wort „USB“ selbst gekennzeichnet.
- Schließen Sie das USB-Kabel an: Nehmen Sie Ihr bewährtes USB-Kabel und verbinden Sie ein Ende mit Ihrem Telefon und das andere mit dem USB-Anschluss Ihres Fernsehers. Falls Sie Adapter oder Konverter benötigen, achten Sie darauf, diese sicher anzuschließen.
- USB-Debugging aktivieren (nur Android): Auf Ihrem Android-Telefon müssen Sie in den Entwickleroptionen „USB-Debugging“ aktivieren. Dadurch kann Ihr Telefon über USB mit dem Fernseher kommunizieren. Suchen Sie einfach in den Telefoneinstellungen nach „USB-Debugging“ und folgen Sie den Anweisungen.
- Auswählen der EingangsquelleSobald alles angeschlossen ist, schnappen Sie sich die Fernbedienung Ihres Fernsehers und schalten Sie die Eingangsquelle auf den USB-Anschluss um, den Sie gerade angeschlossen haben. Möglicherweise werden Optionen wie „USB“, „Medien“ oder „Multimedia“ angezeigt – wählen Sie einfach die entsprechende Option aus.
- Spiegeln oder erweitern Sie Ihr Display: Abhängig von Ihren Geräten wird der Bildschirm Ihres Smartphones entweder auf dem Fernseher gespiegelt oder Sie haben die Möglichkeit, die Anzeige auf beide Bildschirme zu erweitern. Probieren Sie die Einstellungen aus, um Ihren bevorzugten Anzeigemodus zu finden.
- Passen Sie die Einstellungen für eine optimale Anzeige an: Scheuen Sie sich nicht, Dinge wie Auflösung, Ausrichtung und Seitenverhältnis zu optimieren, um die bestmögliche Bildqualität zu erzielen.
Und schon haben Sie Ihr Telefon erfolgreich per USB mit Ihrem Fernseher verbunden! War das nicht einfacher, als Ihrer Katze Quantenphysik beizubringen? (Glauben Sie mir, ich habe es versucht.)
Software und Einstellungen:
Die physische Verbindung bildet das Rückgrat Ihres Setups, doch Software und Einstellungen sind die entscheidenden Faktoren. Je nach Gerät müssen Sie möglicherweise spezielle Apps installieren oder bestimmte Einstellungen anpassen, um eine reibungslose USB-Verbindung zu gewährleisten.
Beispielsweise erfordern einige Android-Geräte Drittanbieter-Apps wie Droid@Screen oder Kabelgebundenes Splashtop XDisplay um die USB-Bildschirmspiegelung zu aktivieren. Diese Apps fungieren als digitale Dolmetscher und übersetzen die Anzeige Ihres Telefons in eine Sprache, die Ihr Fernseher versteht.
Manche Fernseher verfügen hingegen über integrierte „USB Display“- oder „Mobile High-Definition Link“ (MHL)-Einstellungen, die Sie aktivieren müssen. Diese Einstellungen rollen dem Display Ihres Telefons quasi den roten Teppich aus und ermöglichen eine nahtlose Projektion auf die große Leinwand.
Keine Sorge, wenn Sie kein Technik-Experte sind – die meisten modernen Geräte verfügen über benutzerfreundliche Oberflächen und detaillierte Anleitungen, die Sie durch den Vorgang führen. Und falls alles andere fehlschlägt, kann eine schnelle Online-Suche oder ein Besuch auf der Website Ihres Geräteherstellers die benötigten Antworten liefern.
Fehlerbehebung
Häufige Probleme:
Selbst die sorgfältigste USB-Verbindung kann manchmal Probleme bereiten. Aber keine Sorge – wir unterstützen Sie! Hier sind einige häufige Probleme und ihre Lösung:
Keine Anzeige auf dem Fernseher:
- Überprüfen Sie Ihre Kabelverbindungen noch einmal und stellen Sie sicher, dass sie fest eingesteckt sind.
- Wechseln Sie die Eingangsquelle des Fernsehers und versuchen Sie es mit einem anderen USB-Anschluss.
- Starten Sie sowohl Ihr Telefon als auch Ihren Fernseher neu.
Schlechte Bildqualität:
- Passen Sie die Auflösungs- und Seitenverhältniseinstellungen auf Ihren Geräten an.
- Verwenden Sie ein hochwertigeres USB-Kabel oder einen Adapter.
- Aktualisieren Sie die Firmware Ihres Fernsehers oder installieren Sie alle verfügbaren Patches.
Audioprobleme:
- Stellen Sie sicher, dass die Lautsprecher Ihres Fernsehers eingeschaltet und die Lautstärke aufgedreht ist.
- Überprüfen Sie, ob Ihr Fernseher über separate Audioeingangseinstellungen für USB-Verbindungen verfügt.
- Versuchen Sie es mit Kopfhörern oder externen Lautsprechern, die an Ihr Telefon angeschlossen sind.
Verzögertes oder ruckelndes Video:
- Schließen Sie alle nicht benötigten Apps oder Prozesse, die auf Ihrem Telefon ausgeführt werden.
- Verwenden Sie ein Hochgeschwindigkeits-USB-Kabeloder Adapter.
- Verringern Sie die Auflösung oder Bildrate für eine flüssigere Wiedergabe.
Denken Sie daran: Mit etwas Geduld und Ausdauer lässt sich die Fehlersuche leichter lösen. Und wenn alles andere fehlschlägt, scheuen Sie sich nicht, Hilfe in vertrauenswürdigen Online-Foren, beim Hersteller-Support oder bei Ihrem technisch versierten Freund zu suchen, der immer die Antworten parat zu haben scheint.
Leistungsoptimierung:
Nachdem Ihre USB-Verbindung nun funktioniert, ist es an der Zeit, Ihr Setup für ein optimales Erlebnis zu optimieren. Stellen Sie es sich wie die Feinabstimmung eines Hochleistungsmotors vor – ein paar Optimierungen hier und da können einen großen Unterschied machen.
Anzeigeeinstellungen anpassen: Die meisten Fernseher und Smartphones bieten eine Vielzahl von Anzeigeeinstellungen, die Ihr Seherlebnis deutlich verbessern können. Probieren Sie Optionen wie Helligkeit, Kontrast, Farbtemperatur und sogar voreingestellte Modi wie „Kino“ oder „Spiel“ aus, um die perfekte Balance für Ihre Bedürfnisse zu finden.
Aktivieren Sie hochauflösende Modi: Sofern Ihre Geräte dies unterstützen, können hochauflösende Modi wie 4K oder 1440p für eine Detailgenauigkeit und Klarheit sorgen, die Ihre Augen zum Leuchten bringt. Beachten Sie jedoch die möglichen Leistungseinbußen auf älteren oder weniger leistungsstarken Geräten.
Verwenden Sie ein High-Speed-USB-Kabel: Das alte USB-Kabel könnte zwar funktionieren, die Investition in ein Hochgeschwindigkeitskabel (USB 3.0 oder höher) kann die Datenübertragungsraten erheblich verbessern und Verzögerungen oder Stottern reduzieren, insbesondere beim Streamen von hochauflösenden Videos oder beim Spielen.
Optimieren Sie die Telefonleistung: Schließen Sie alle nicht benötigten Apps oder Prozesse auf Ihrem Telefon, um Ressourcen freizugeben und Leistungsengpässe zu vermeiden. Sie können auch Leistungsmodi oder Übertaktungsfunktionen aktivieren, sofern Ihr Telefon diese unterstützt (Vorsicht, dies kann die Akkulaufzeit oder die Gerätestabilität beeinträchtigen).
Positionieren Sie Geräte strategisch: Ob Sie es glauben oder nicht, auch die Platzierung Ihrer Geräte kann die Leistung beeinflussen. Versuchen Sie, die Kabellänge zu minimieren und platzieren Sie Telefon und Fernseher relativ nah beieinander, um mögliche Signalverschlechterungen oder Störungen zu vermeiden.
Denken Sie daran: Die Optimierung Ihres Setups ist ein fortlaufender Prozess. Scheuen Sie sich nicht, zu experimentieren und die Einstellungen zu finden, die für Ihren spezifischen Anwendungsfall am besten geeignet sind, egal ob Sie Filme streamen, Spiele spielen oder einfach nur ein größeres Display für alltägliche Aufgaben nutzen möchten.
Alternative Lösungen
USB-Anschlüsse bieten zwar eine fantastische Kombination aus Einfachheit und Vielseitigkeit, sind aber nicht die einzige Möglichkeit. Die Technologie entwickelt sich ständig weiter, und es entstehen immer wieder alternative Lösungen, jede mit ihren eigenen Vor- und Nachteilen.
Optionen für die drahtlose Verbindung:
Wenn Sie keine Kabel mögen (oder einfach keinen passenden Adapter finden), könnte die drahtlose Bildschirmspiegelung die Lösung sein. Beliebte Optionen sind:
Miracast: Miracast ist in viele moderne Geräte integriert und ermöglicht Ihnen, das Display Ihres Telefons drahtlos auf kompatible Fernseher oder Dongles zu spiegeln, ohne dass Kabel oder zusätzliche Apps erforderlich sind.
Chromecast: Mit Googles praktischem kleinen Streaming-Gerät können Sie Inhalte von Ihrem Telefon oder anderen Geräten direkt auf Ihren Fernseher übertragen. Es handelt sich zwar nicht um echtes Mirroring, aber es ist eine großartige Option zum Streamen von Videos, Fotos und sogar Spielen.
AirPlay: Die proprietäre Bildschirmspiegelungstechnologie von Apple funktioniert nahtlos zwischen iPhones, iPads und Apple TVs und ist daher eine praktische Wahl für alle, die bereits in das Apple-Ökosystem investiert haben.
Drahtlose Lösungen bieten zwar beispiellosen Komfort und Flexibilität, können jedoch manchmal unter Verzögerungen, Störungen oder Kompatibilitätsproblemen leiden – insbesondere in stark frequentierten drahtlosen Umgebungen oder bei älteren Geräten.
App-unterstützte Verbindungen:
Wenn Sie eine speziellere Lösung suchen, gibt es zahlreiche Apps von Drittanbietern, die USB-Verbindungen ermöglichen oder über die einfache Bildschirmspiegelung hinaus zusätzliche Funktionen bieten. Hier sind einige beliebte Optionen:
Droid@Screen: Mit dieser leistungsstarken App können Sie das Display Ihres Android-Geräts über USB auf Ihren Fernseher oder Computer spiegeln und erhalten gleichzeitig Funktionen wie Dateiübertragung, Fernbedienung und sogar Spiele-Streaming.
Kabelgebundenes Splashtop XDisplay: Mit Unterstützung für USB- und drahtlose Verbindungen bietet Splashtop Wired XDisplay ein nahtloses Spiegelungserlebnis mit geringer Latenz und erweiterten Funktionen wie Touch-Steuerung und Audio-Streaming.
ApowerMirror: ApowerMirror wurde sowohl für Android- als auch für iOS-Geräte entwickelt und bietet eine Reihe von Verbindungsoptionen, darunter USB, WLAN und sogar Cloud-basierte Spiegelung, was es zu einer vielseitigen Wahl für verschiedene Setups macht.
Obwohl für diese Apps häufig zusätzliche Gebühren oder Abonnements anfallen, können sie im Vergleich zu integrierten Spiegelungslösungen ein robusteres und funktionsreicheres Erlebnis bieten.

Abschluss
Und da haben Sie es – eine umfassende Anleitung zum Verbinden Ihres Telefons mit Ihrem Fernseher über USB, inklusive Tipps zur Fehlerbehebung, Optimierungsstrategien und alternativen Lösungen. Jetzt sind Sie praktisch ein USB-Verbindungsexperte!
Aber warum damit aufhören? Mit dem erworbenen Wissen können Sie zur Anlaufstelle für alle Ihre Freunde und Familienmitglieder werden, die das Potenzial ihrer Geräte voll ausschöpfen möchten. Stellen Sie sich ihre Gesichter vor, wenn Sie einfach hereinspazieren, ihr Telefon mit ein paar geschickten Handgriffen an den Fernseher anschließen und sagen: „Gern geschehen!“
Im Ernst: USB-Verbindungen bieten eine einfache und dennoch leistungsstarke Möglichkeit, die Verbindung zwischen Ihren Mobilgeräten und dem großen Bildschirm zu überbrücken. Egal, ob Sie Erinnerungen teilen, im großen Stil spielen oder einfach ein intensiveres mobiles Erlebnis genießen möchten – die Welt der USB-Konnektivität steht Ihnen offen.
Also los, vernetzen Sie sich und erobern Sie die Welt – denn im digitalen Zeitalter ist die nahtlose Integration Ihrer Geräte eine wahre Superkraft, die Ihnen von Nutzen sein wird. Und wer weiß? Vielleicht verbinden wir eines Tages unsere Smartphones mit holografischen Displays oder projizieren Augmented Reality direkt aus der Tasche. Die Möglichkeiten sind endlos, und Sie, mein Freund, sind jetzt bestens gerüstet, sie alle zu nutzen!
Leute fragen auch
Warum lässt sich mein Telefon nicht über USB mit meinem Fernseher verbinden?
Es kann mehrere Gründe geben, warum Ihr Telefon keine Verbindung über USB zu Ihrem Fernseher herstellt:
- Inkompatibles USB-Kabel: Stellen Sie sicher, dass Sie für die Datenübertragung ein kompatibles USB-Kabel verwenden.
- Falscher USB-Modus: Stellen Sie sicher, dass Ihr Telefon auf den richtigen USB-Modus eingestellt ist (e.g., MTP oder Dateiübertragung).
- Fehlerhafter USB-Anschluss: Überprüfen Sie die USB-Anschlüsse Ihres Telefons und Ihres Fernsehers auf Schäden oder Ablagerungen.
- Softwareprobleme: Aktualisieren Sie die Software Ihres Telefons und prüfen Sie, ob Kompatibilitätsprobleme zwischen Ihrem Telefon und Ihrem Fernseher vorliegen.
Wie verbinde ich mein USB-Gerät mit meinem Fernseher ohne USB-Anschluss?
Wenn Ihr Fernseher keinen USB-Anschluss hat, können Sie Ihr USB-Gerät trotzdem mit alternativen Methoden anschließen:
- HDMI-zu-USB-Adapter: Verwenden Sie einen HDMI-zu-USB-Adapter, wenn Ihr Fernseher über einen HDMI-Anschluss verfügt.
- Mediaplayer: Verbinden Sie Ihr USB-Gerät mit einem Mediaplayer, der an Ihr Fernsehgerät angeschlossen werden kann.
- Smart-TV-Box: Verwenden Sie eine Smart-TV-Box, die USB-Konnektivität unterstützt, um auf Ihre USB-Inhalte auf Ihrem Fernseher zuzugreifen.
Wie verbinde ich mein Android-Telefon über USB mit meinem normalen Fernseher?
Um Ihr Android-Telefon über USB mit einem normalen Fernseher zu verbinden, gehen Sie folgendermaßen vor:
- Verwenden Sie MHL oder SlimPort: Prüfen Sie, ob Ihr Telefon die MHL- oder SlimPort-Technologie für die Konvertierung von USB zu HDMI unterstützt.
- USB-C-zu-HDMI-Adapter: Verwenden Sie einen USB-C-zu-HDMI-Adapter, wenn Ihr Telefon über einen USB-C-Anschluss verfügt.
- Bildschirmspiegelung: Einige Android-Telefone unterstützen die Bildschirmspiegelung über USB, sodass Sie den Bildschirm Ihres Telefons auf dem Fernseher anzeigen können.
Welches Format muss ein USB-Stick für den Fernseher haben?
Die meisten Fernseher unterstützen USB-Sticks im FAT32- oder exFAT-Format. Stellen Sie sicher, dass Ihr USB-Stick in einem dieser Formate formatiert ist, um die Kompatibilität mit Ihrem Fernseher sicherzustellen. Überprüfen Sie außerdem das Handbuch oder die Spezifikationen Ihres Fernsehers auf eventuelle spezifische Formatanforderungen.

3 Kommentare
Suraj i
Shdvdhryt
Suraj i
Fbcfdydgr14
Soul brown
Connecter mon téléphone
Hinterlassen Sie einen Kommentar
Diese Website ist durch hCaptcha geschützt und es gelten die allgemeinen Geschäftsbedingungen und Datenschutzbestimmungen von hCaptcha.